Enabling Seamless AWS Multi-Account Connectivity with AWS Transit Gateway
The AWS Transit Gateway Setup project is anticipated to result in a more streamlined, secure, and manageable network infrastructure for organizations operating across multiple AWS accounts. By embracing AWS Transit Gateway’s capabilities, empower businesses to focus on their core activities while enjoying enhanced network connectivity without the complexity typically associated with multi-account networking & peering.

- Simplified Network Architecture: The enterprise no longer needs to establish complex, point-to-point connections between each VPC which puts an end to complex peering relationships. The transit gateway acts as a central hub, reducing the need for managing numerous connections.
- Isolation and Security: Each VPC remains isolated, ensuring that sensitive data and resources are protected. Traffic between VPCs passes through controlled routes, enhancing security. It can connect Amazon VPCs, AWS accounts, and on-premises networks to a single gateway.
- Efficient Data Transfer: By centralizing traffic flow, the transit gateway optimizes data transfer between VPCs, resulting in improved network efficiency. AWS Transit Gateway provides statistics and logs that are then used by services such as Amazon CloudWatch and Amazon VPC Flow Logs.
- Scalability: As the enterprise grows and introduces new departments or business units, scaling the network becomes easier, as new VPCs can be integrated with the transit gateway seamlessly. Just like modern day Landing zone where multiple accounts are deployed & managed. Transit gateway plays a vital role for network connectivity across AWS accounts.
- Operational Simplicity: With Transit Gateway, the project illustrates how network administrators can manage, monitor, and troubleshoot connectivity from a single interface, enhancing operational efficiency.
Overall, AWS Transit Gateway offers secure edge connectivity, network management, single interface monitor and scalable approach for managing network connectivity across complex multi-account AWS environments & on-premises networks. It enables organizations to efficiently manage their cloud networking, operational efficiency, and streamline practices.
Prerequisite —
- 3 AWS Account with Admin Access.
- This we have created in my AWS Landing Zone setup through AWS Control Tower Blog.
- VPC in each AWS account with 2 Private subnets, 2 Public subnet, 3 Route Table, 1 Nat gateway & IGW.
AWS Services Usage —
AWS VPC, IAM, Transit Gateway, EC2, SG
STEP BY STEP GUIDE -
STEP 1 : Create VPC in all 3 of the AWS accounts.
1st AWS Account for Management VPC.
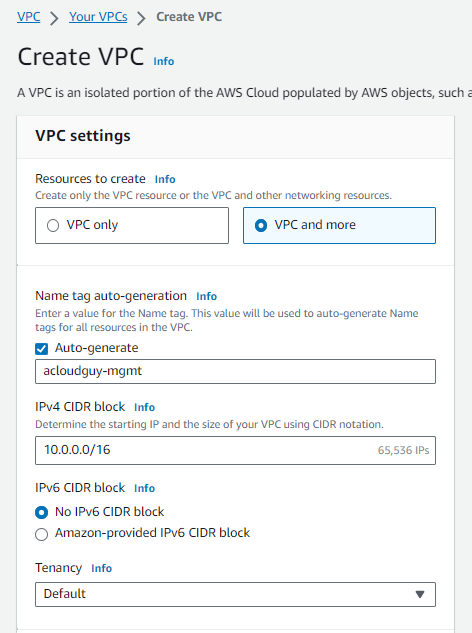
- In the VPC Dashboard, choose Create VPC.
- Under VPC settings, choose VPC and more.
- Complete these fields as follows:
- Keep Auto-generated selected under Name tag auto-generation.
- Change project to
<any name you want>. - The IPv4 CIDR block should be
10.100.0.0/16. - Keep No IPv6 CIDR block option selected.
- The Tenancy should remain Default.
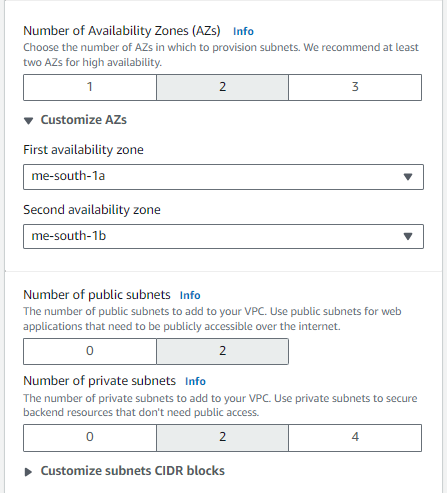
- Select 2 for the Number of Availability Zones (AZs).
- Select 2 for the Number of public subnets and private subnets.
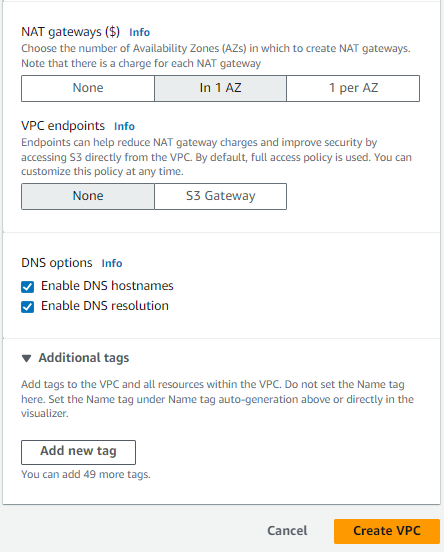
- Select 1 Nat Gateway & VPC endpoints should be None.
- DNS options — check mark both.
- Choose Create VPC. It takes several minutes for the VPC to be created.

2nd AWS Account for Audit VPC.
- Follow the same steps as followed above in 2nd AWS Account.
- Change project to
<any name you want>. - The IPv4 CIDR block should be
10.110.0.0/16.
3rd AWS Account for Logs VPC.
- Follow the same steps as followed above in 3rd AWS Account.
- Change project to
<any name you want>. - The IPv4 CIDR block should be
10.120.0.0/16.
Now All 3 AWS Accounts ( Management, Audit & Logs ) have custom VPC.
STEP 2 : Create Transit Gateway
- Log in to the AWS Management Console of the 1st AWS Account (Management account)
- Navigate to VPC and select Transit Gateways
- Add Name tag and Description for AWS Transit Gateway.
- Enter the private ASN for your transit gateway. The range is from 64512 to 65534 for 16-bit ASNs. Read more on ASN
- For now enter 64555 as Amazon Side Autonomous System Number (ASN). It must be unique and cannot be the same one used for your Direct Connect or VPN.
- Select checkbox for DNS Support, VPN ECMP Support, Default Route Table association and Default Route Table Propagation.

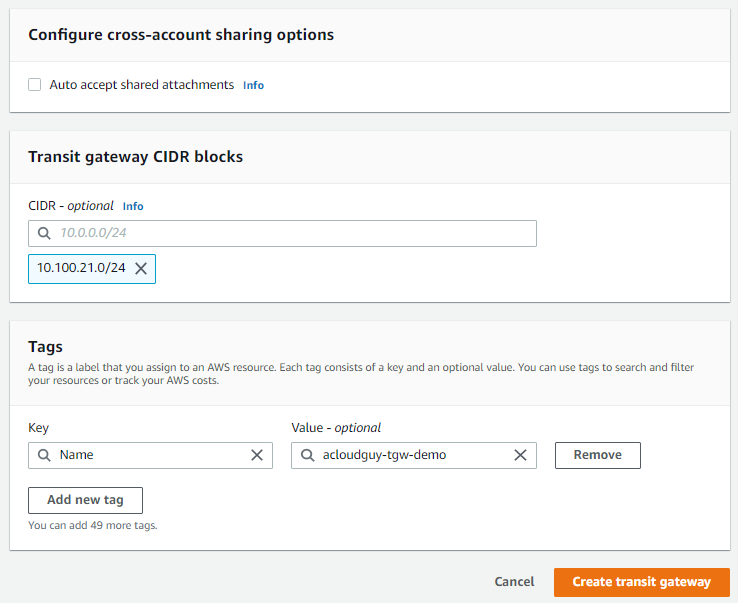
- Now head over to VPC > Subnets & copy Private subnet CIDR.
- Add copied private subnet CIDR in Transit gateway CIDR blocks.
- Give tags & hit Create transit gateway.
- It will take about 30 seconds for the Transit Gateway to be in the available state.

STEP 3 : Share Resources across Organization AWS accounts.
- AWS RAM (Resource Access Manager) helps us securely share our resources across AWS accounts, within our organization or organizational units (OUs), and with IAM roles and users for supported resource types.
- Open the AWS RAM console
- Choose Create resource share from the Shared by me
- For Name, enter a any name for the resource share.
- Under Resources, from dropdown select Transit Gateway.
- Select the Transit gateway which we created above in step 2 & hit next.
- For Associate managed permissions — optional — hit next.
- For Grant access to principals
- Select Allow sharing only within your organization & select Principal ID
- Review & Create resource share.


STEP 4 : Transit Gateway Attachments
- Open the Amazon VPC console in 1st AWS Account (Management account)
- On the navigation pane, choose Transit Gateway Attachments.
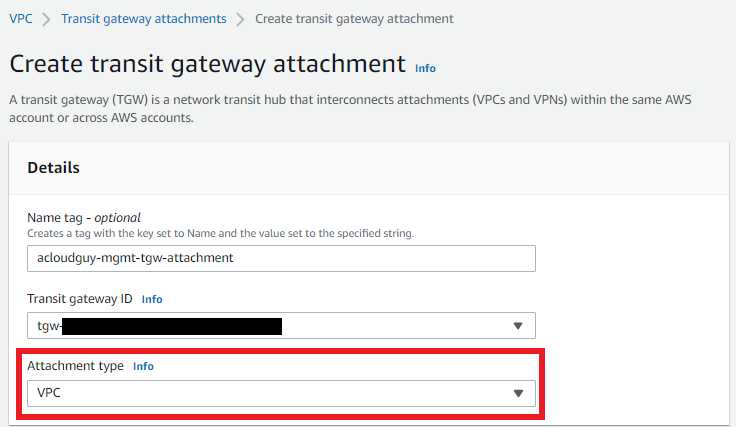
- Choose Create transit gateway attachment.
- For Name tag, optionally enter a name for the transit gateway attachment.
- For Transit gateway ID, choose the transit gateway for the attachment. We can choose a transit gateway that we created.
- For Attachment type, choose VPC.
- Choose whether to enable DNS Support and IPv6 Support.
- For VPC ID, choose the VPC to attach to the transit gateway.
- For Subnet IDs, select one private subnet for each Availability Zone to be used by the transit gateway to route traffic.
- Choose Create transit gateway attachment.

STEP 5 : Transit Gateway Attachments for other AWS Accounts
- Follow the same steps in 2nd AWS Account (Audit) & 3rd AWS Account (Logs)
- We already shared the Transit Gateway in this accounts through AWS RAM. Hence we don't need to create a new Transit Gateway.
- We will use the same Transit Gateway & create new Transit Gateway attachments.
- After completing the Transit Gateway attachments we will see the snapshot as below

STEP 6 : Creating Transit Gateway Route Tables, Associations, and Propagations
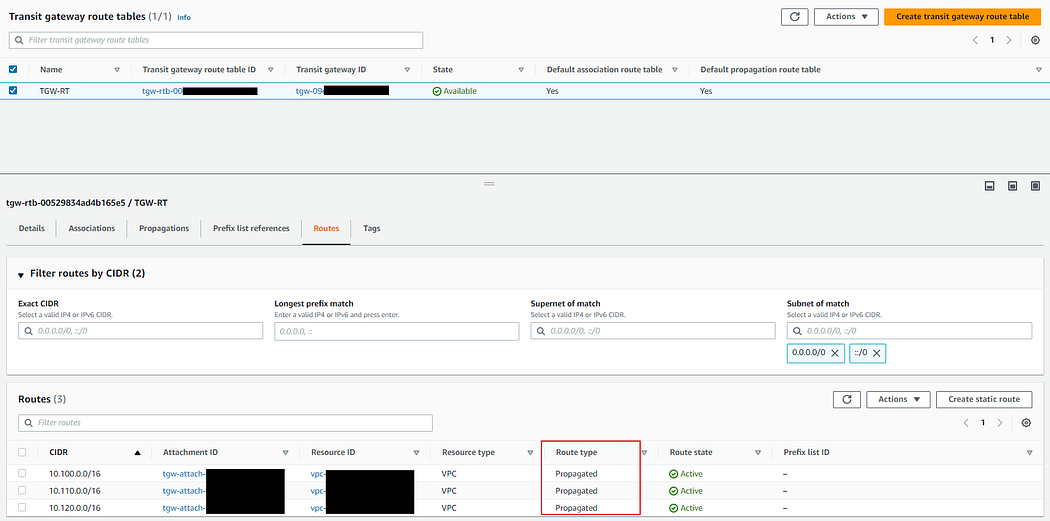
- Transit Gateway Route Tables are the elements that allows traffic to pass through the Transit Gateway between each attachment.
- They only exist in the account that owns the Transit Gateway. In our case its 1st AWS Account ( Management account )
- Transit Gateway Attachments are associated to a Transit Gateway Route Table.
- An attachment can only be associated to one route table. However, you can have multiple attachments associated to a single route table.
- Navigate to VPC -> Transit Gateways route tables
- Click on Routes tab.
- Our routing table should be populated with “Management VPC”, “Audit VPC”, “Logs VPC” routes
STEP 7 : Update Route Tables of VPCs
- Navigate to Route Tables, select Management VPC Private Route Table 1.
- Click on Routes tab.
- Edit routes & add routes for Audit & Logs VPC CIDR.

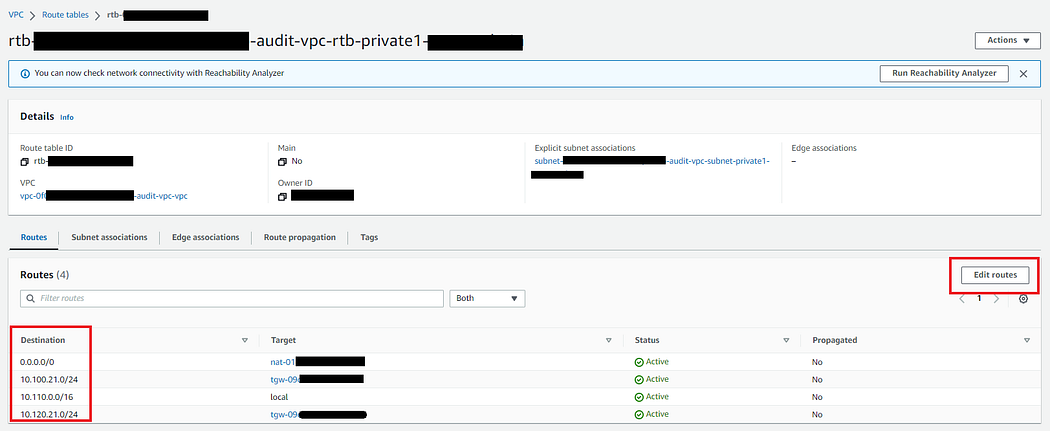
- Navigate to 2nd AWS Audit Account -> Route Tables, select Audit VPC Private Route Table 1.
- Click on Routes tab.
- Edit routes & add routes for Management & Logs VPC CIDR.
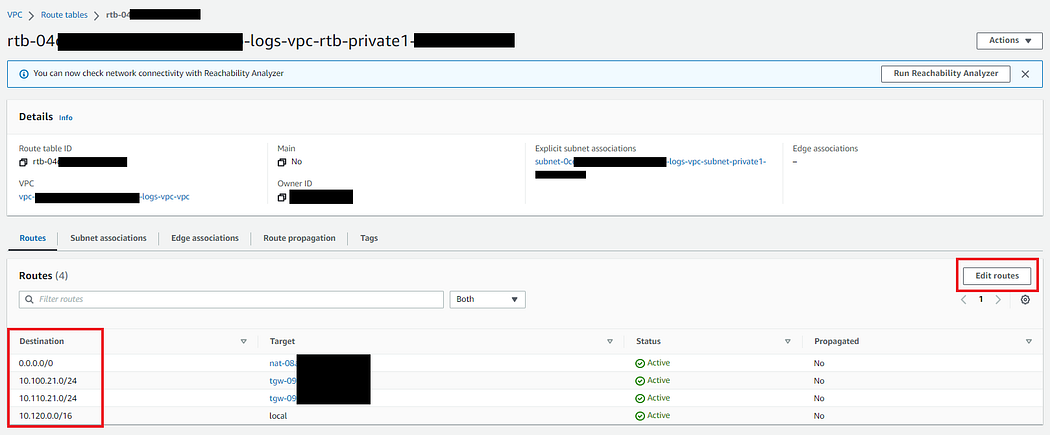
- Navigate to 3rd AWS Logs Account -> Route Tables, select Logs VPC Private Route Table 1.
- Click on Routes tab.
- Edit routes & add routes for Management & Audit VPC CIDR.
STEP 8 : Create EC2 Instances for connectivity test
- We will create Total 3 EC2 instances, 1 each in each AWS account.
- CloudFormation Template for Creating EC2 Instance, Security Group, IAM role & Instance Profile.
- ec2-tgw.yml
- Verify Instance status checks after creating in Management, Audit & Logs AWS account.
STEP 8 : Ping Test across AWS accounts
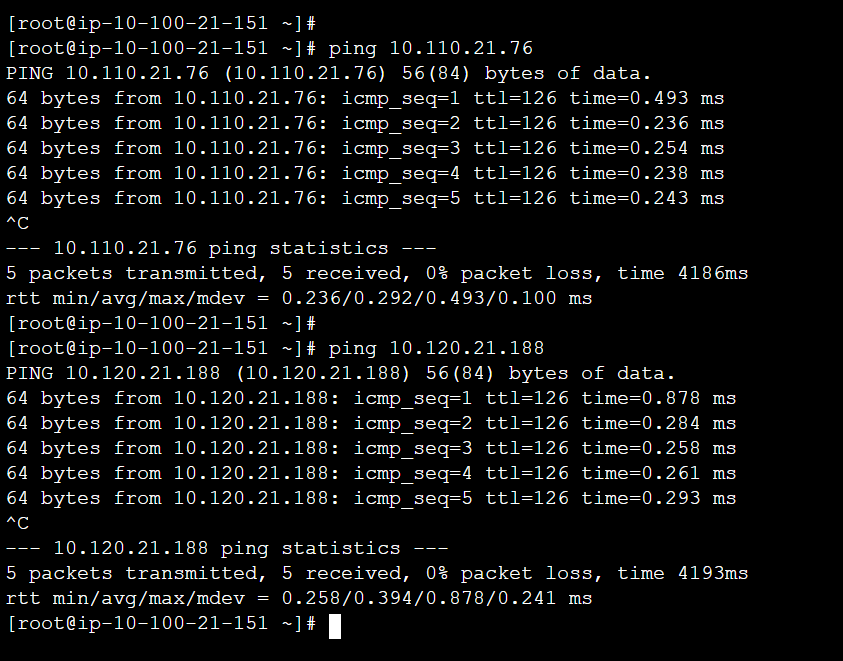
- Now go ahead & login to Management account EC2 Instance to start pinging to Audit & Log EC2 Instances.
- ping <audit_ec2_ip_address>
- ping <log_ec2_ip_address>
- Ping result needs to be successfully transmitted.
- Now login to Audit account EC2 Instance to start pinging to Management & Log EC2 Instances.
- ping <management_ec2_ip_address>
- ping <log_ec2_ip_address>

.svg)
%20(6).png)


.png)
